Sunday 31 March 2013

Assets: Button Machine


     This is the machine where most of the action will take place as our two characters fight over who is going to press the button and activate their newest invention. Once again, the final version of this machine was built by Tiago Faria and modelled on top of the placeholder version I made (first grey image).


Below are a few renders of just the button.


Concept: Me
Initial 3D Model: Me
Detailed 3D Model: Tiago Faria
Texture: Me 

Assets: Plug Machine


          This was the 'terminal' or 'hub' which some of the major cables from the other machines were plugged into. This is the place where our cleaner character unplgs one of the main machines to plug in her vacuum cleaner, causing the inventors to wander about what the problem is.


          (Above) Not very happy with this. The frame of the machine really stands out and just doesn't match the rest of the body at all. The pipes coming out of the blue center had the same texture but once again I didn't like this because it blended too much with the frame.


           (Above) Once again, not very happy with this one. The colours just seemed too uniform. The environment which this is going to go into is quite a dark one anyway so I didn't want everything to just be a massive orange slur with only one distinguishable shape - the blue in the middle. Below is the final texture for the machine


Concept: Me
Initial 3D Model: N/A
Detailed 3D Model: Tiago Faria
Texture: Me 

Saturday 30 March 2013

Assets: Central Machine


The name for this machine is slightly elusive. It was name 'central machine' purely because it was located at the very center of the crystal structure. I am relatively happy with the design although I was trying hard to keep the whole thing at a low level of detail as it will only ever be seen in the background, never in detail.


(Above) I was afraid that the textures for all the machines would end up making them look too uniform and making them blend with one another so I tried to make this more copper-like. The problem with the image above is not only is the colour not coppery, it is too far from the yellowy hues of the rest of the machinery so thats what I went back to for the rest of the images below.


Concept: Me
Initial 3D Model: Me
Detailed 3D Model: Me
Texture: Me 


Assets: Terminal


         This was one of the machines not built by myself. Below you can see the roughed out 3D version of the Terminal which I made before giving it to Tiago to model to a higher standard. I felt like the concept drawings needed to be expanded slightly and I found it much more useful doing this in 3D.


          Below is the progression of the texturing process. The machine design seen below is based directly off the 3D placeholders you see above.


          (Below) I had left the terminal for a while as I was conceptrating on the other machine, but once I went back over it I found myself very unhappy with its texturing. I realised that with all the newer machines I was using a custom inde of refraction value which was giving me much better results. I was also generally unhappy with the lack of detail in some areas so I went in and added the detail myself as well as changing the textures a bit.


Concept: Me
Initial 3D Model: Me
Detailed 3D Model: Tiago Faria
Texture: Me

Assets: Cables Machine


          Pay no attention to the naming of this machine, it was based purely on the fact that the machine had blue cables...

          The purpose of this machine was more to cover up/replace two central collumns I had put in the scene previously.


          Seeing as this was the first machine I built and textured for the environment I was pretty happy with how it turned out. I was afraid the texture might ot sit right with one another but I think the addition of a lighter material for the two pipes on the side breaks up the somewhat monotonous yellow of the rest of the machine.

Concept: N/A
Initial 3D Model:Me
Detailed 3D Model: Me
Texture: Me 

'The Big Red': Working in 3D


          Having established which assets we needed for our environments it was time to start making them. Unfortunately my workload increased exponentially which meant that I only got to build and texture three machines while the rest of them were built by Tiago Faria and then textured by me. The look I was going for with the textures was worn, rusty in places, and generally dirty. Although the aim was to make the machines look as real as possible, they also had to fit the world of the animation. The best way to do so was to avoid using images as textures. By this I mean that only six images were used in th texturing of the entire scene, everything else was drawn from scratch in Photoshop using real life photos as a reference. I feel that the result was satisfacroty and that the textures fit perfectly into the scene. 

          I will make a separate post for each individual machine to show the development of the texturing process so the only images I am going to add to this post are of the cathedral at the very start of the new story idea and then a later version of it:


'The Big Red': Concepts

'The Big Red'
Concepts:

The good thing about the story change is that it used only one environment and it was one of the ones which I had put some time into - the cathedral. Although the cathedral was the least finished of all the environments it was still something which was already built.

My main task now as to try and populate the scene with various bits of machinery and create a kind of 'hub' or central area where the inventors would do most of their work. Below are various concepts I came up with for the different machines:


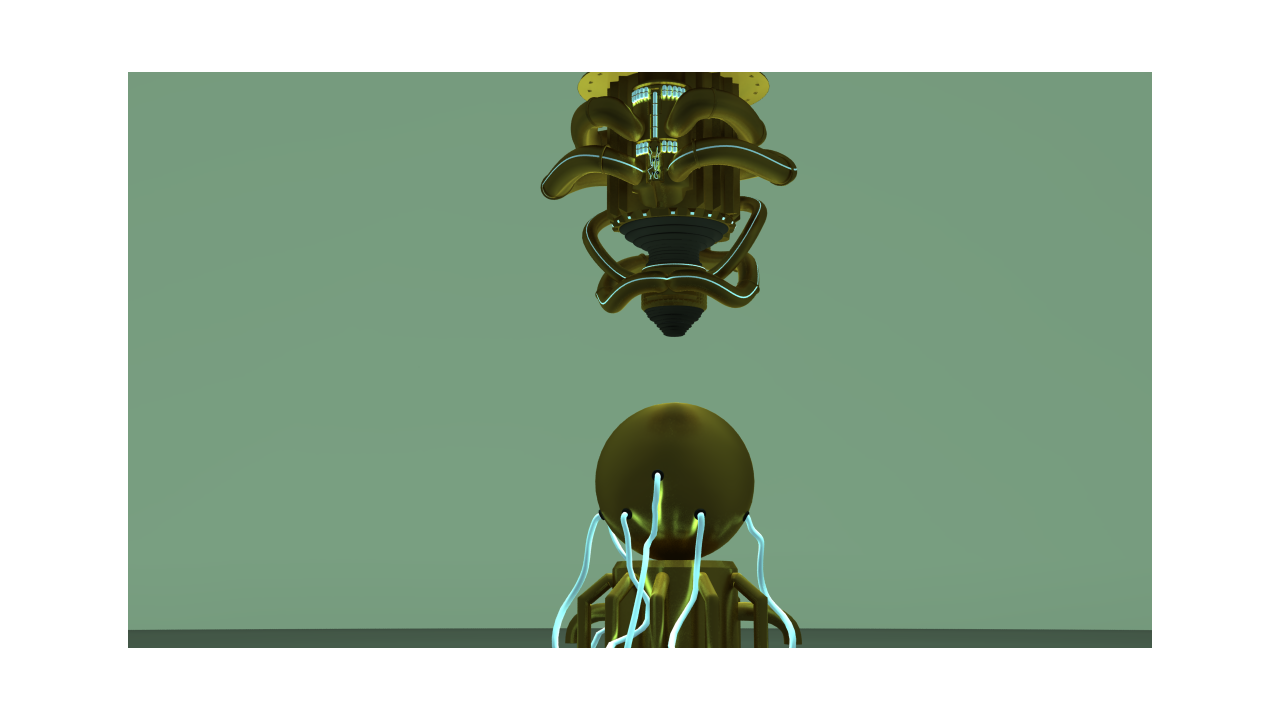
(Above) The activation button. This is the machine on which has the main activation switch for the great invention the two characters have just finished making. I tried to keep it simple on the top of the machine as any kind of clutter will draw the viewer's attention away from the button itself.


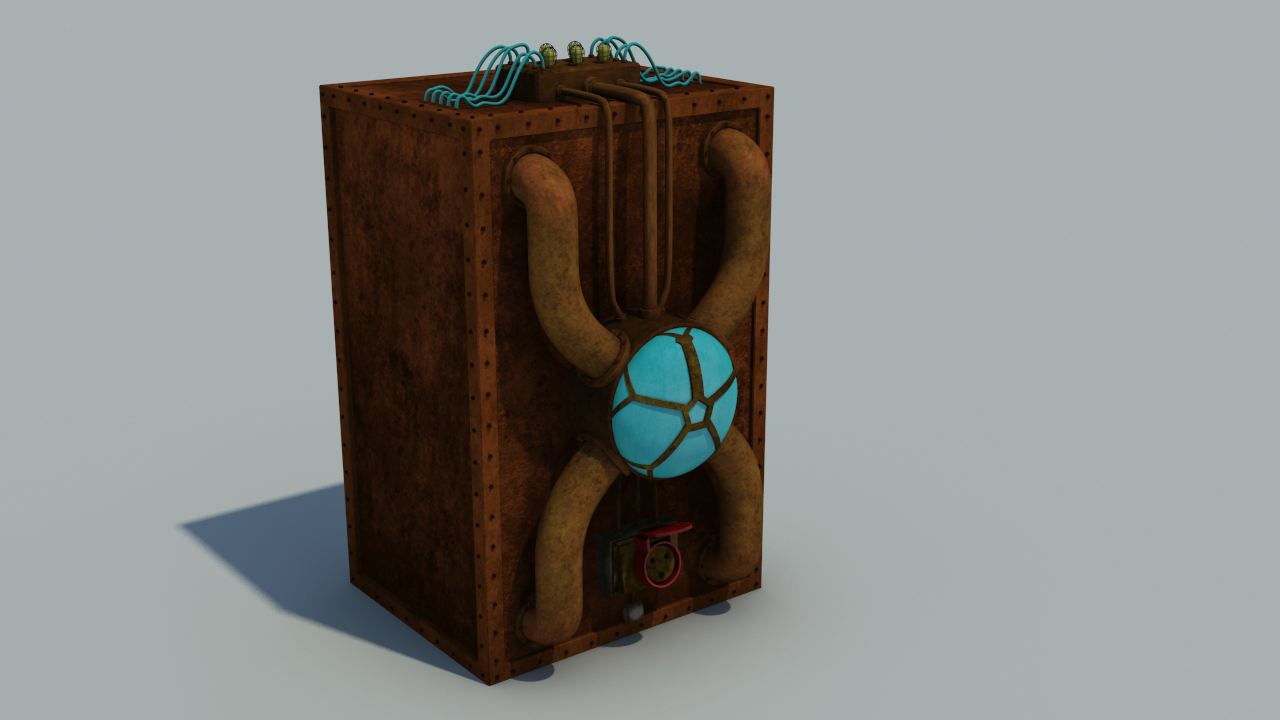
(Above) The terminal. This machine is supposed to be the power terminal for the activation of the button machine. I designed it to be cluttered with a lot of gauges and pipes everywhere trying to make it look as asymmetrical as possible but also give it the appearance of some kind of connection 'hub'.


(Above) These were just some general machine designs. Their purpose wouldn't matter in the animation too much so they were there just to add mode to the space.


(Above) Tese were all concepts for a plug machine. We have a cleaner in the animation who is going around with a floor buffwe while the two inventors argue with each other. In one of the scenes she unplugs the main machine that the inventors are trying to power up in order to plug her own floor buffer into.  

With all of the above concepts I started off with a few initial designs. The rest of the design ideas for each machine usually used aspects of the first two concept drawings. I find this way of working very helpful because I can come up with the initial ideas relatively fast and from then on it is just a matter of combining the right bits from each design in order to arrive to a final one.

Thursday 28 March 2013

'The Big Red': New Beginnings


          This was the point when we realised that the story we had set out to do was actually no good. Since its conception the script had gone through about 12 changes and by the end the idea we were gearing the animation towards was far detached from the original concept.

          However we were clever with this and built the new idea around one of the environments that we already had - the cathedral. 

          The new idea goes something like this: There are 2 inventors who have just finished constructing a machone which creates electricity through the extraction of crystals. They are about to go down in history for this amazing discovery. The finishing touches have been made to all the machinery and the main power extractor is ready to go; all that remains is for one of them to press the big red activation button. This is where the fun begins..

Monday 25 March 2013

Cumuli: Working in 3D


Now that all the concept art is done it is time to build the environments in 3D. The first step was to block out the shapes within the space and see how the concept translates into 3D


3D corridor model by Tiago Faria


 Unfortunately, as you can see by the render above, the corridor seemed very repetitive which resulted in me going back to the drawing board so that I could really push for the whole idea of 'art deco'.


Ideas for art deco on walls of corridor


After sketching out the above designs I wanted to actually make some of them in 3D and start implementing them into the scene.


Art Deco and new machine


After making the place look a little more art deco I started finalising the scene. Below are a few progression shots of the development of the corridor:


First draft corridor


Second draft corridor


Finished corridor

I am not quite sure how I feel about the last render. Although I will go into this in a bit more detail our project idea changed and this environment was no longer was going to be used. I am quite happy with how it looks considering that the only things which have a custom texture are the lights and the central floor. Everything else was made using the ProMaterials and adjusting the metal presets.

 Next are the central cathedral and Queen's inner chambers. I started off with the power extracting machine based on the concept art. It was quite easy making it purely because I was the one who came up with teh concept so I knew exactly what I wanted.
3D build of machine concept


Below are some renders detailing the progression of the cathedral. I built the supports and the central chamber first so I could properly gauge the scale of the space.


Initial 3D Cathedral built by Tiago Faria


 After building the central machine I decided to take over the making of the cathedral space purely because it was a rather comples scene and I knew exactly what I wanted so I let Tiago work on the second corridor and started remodelling the cathedral:


Getting the initial proportions of the scene right


More polished version of the cathedral


Cathedral AO Render


Queen's Chambers
This is about as far as I got with the environments before our story took a complete turn around. Although I had to scrap the corridor I made it meant I was able to concentrate on a single environment - the cathedral. I will talk more about this in my next post.